Tutorial: The 3-2-1 Throw, A Quick & Easy Little Quilt

It's true! This really is an easy and fast quilted throw! Perfect for beginners who feel a bit intimidated about quilting, or for the more experienced who want to put something together super-quick! This quilt utilizes the "pillow-case" method of binding, so there are no bias strips to make. Please note, however, this method of binding quilts is best only for small quilts like throws and baby blankets.
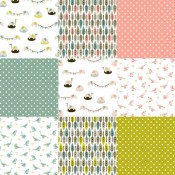
The 3-2-1 Quilted Throw is made with organic fabrics and organic batting. I used fabric from the My Happy Garden collection by Cloud9 Organics. (Found at Modern Organic Fabrics Shop)
Supplies:
~My Happy Garden organic cotton fabric as follows:
- Speckle Grass - 12 1/2" x 48"
- Meadow - 12 1/2" x 24 1/4"
- Speckle Sun - 12 1/2" x 24 1/4"
- Speckle Sky - 12 1/2" x 16 1/4"
- Toadstools - 12 1/2" x 16 1/2"
- Flock - 12 1/2" x 16 1/4"
- Lines - approximately 37" x 49" (this is the backing fabric, it is cut a little large at first and will be cut to size after the front is finished)
~Organic cotton batting:
Approximately 40" x 50" (cut a little large, will be cut to size when the front is finished)
~Thread
Tools:
~Rotary cutter & cutting mat (or scissors)
~masking or painter's tape
~pins
~sewing machine (or needle & thread)
***1/4 inch seam allowances are used, unless stated otherwise***
 Diagram is not to scale
~Step One~
Cut pieces for quilt front. Do not cut back to exact size yet.
~Step Two~
With right sides together, pin Speckle Sky and Toadstools together on one short side and stitch. Place Flock on Toadstools, right sides together, pin and stitch on short side.
~Step Three~
With right sides together, pin Meadow and Speckle Sun together and stitch on one short side.

~Step Four~
Place each column on the batting in it's approximate finished spot. Remove the 3-piece column and the 1-piece column. Pin the 2-piece (middle) column to batting.

~Step Five~
Stitch the middle row to the batting by stitching around the edge.

~Step Six~
Place the 1-piece column right side down on the 2-piece column. Pin and stitch long sides together (you are also stitching it to the batting).
~Step Seven~
Flip the 1-piece column back, pin wrong side to batting. Stitch around edge.

~Step Eight~
Place the 3-piece column face down on the 2-piece column. Pin and stitch long sides together (you are also stitching it to the batting).
~Step Nine~
Flip the 3-piece column back, pin wrong side to batting. Stitch around edge.

~Step Ten~
Trim the batting to the quilt top. Make sure the quilt edges are straight and corners are squared up, trim if necessary.

~Step Eleven~
Tape the backing fabric to a table or the floor right side up. Place the quilt top right side down on the backing and pin. Trim the backing to same size as top, keep quilt pinned together.
~Step Twelve~
Stitch front and back together, leaving a 4-inch opening on one short side.

~Step Thirteen~
Trim the corners. Turn quilt inside-out and use a dull, pointed instrument (such as a chopstick) to turn out corners.
~Step Fourteen~
Press edges. Sew opening closed (the best way is to hand sew it closed).

~Step Fifteen~
Sew around edge of quilt using a 1/2-inch seam allowance.


~Step Sixteen~
You can be finished, if you'd like. This quilt is small enough that you don't have to quilt the back. However, this is a great little quilt to practice some machine quilting. I used a walking foot on my machine and stitched random diagonal lines.
~Step Seventeen~
Wash the quilt in cold water with a mild, eco-friendly detergent. Hang dry, or put in the dryer on low heat.
~Step Eighteen~
Snuggle!

 Monday, October 5, 2009 at 5:37AM | |
  25 Comments



Reader Comments (25)
This is a beautiful throw. The fabrics are gorgeous! This technique is very similar to how I piece together the fabric prior to cutting out the pieced skirts that I sell in my other life on http://lblanche.etsy.com.
I love it! The fabric is delicious! I just want to eat it up. I can't wait to try it.
You make it look so easy! Love those fabrics.
I've just come over from your wonderful Fabric Shopper blog. The quilt is gorgeous and I love the snuggle picture.
Wishing you much happiness in your new organic fabric adventures,
Florence x
Would you consider putting a kit together for this sweet quilt? I think it is just adorable.
I will follow you here;)
Nicely done! Looks so cozy.
Thanks for the post! I have a stash of FQs at home just waiting to be tured into a small quilt for my little one. As having never before quilted this tute seems like a perfect starter!
Thanks for this easy tutorial! I've never quilted before and would really love to try it. I'll definitely refer to your tutorial when I do! :)
Thank you so much for this tutorial! I wanted to make a quilt for my little daughter for the longest time but never thought I could do it. But tonight, I sat down and bloody beginner that I am, I got it all done and finished in one sitting. I'm ridiculously happy and proud of the result (which is in the wash right now). The quilt came out beautifully and I will definitely do it again.
Thanks!
Cute quilt! This is Carin from Margaret's Hope Chest and I wanted to stop by your blog and say thanks for helping us reach our goal of 400 quilts! The work of your hands will bring hope to a child in Michigan!
Love this--sometimes simple is better. The envelope blanket is so fast and easy cozy!
What a wonderful quilt! I have been trying to find a simple project to start with (I have never made a quilt before) and I think this one is it! I love the colors too! :)
This is great. I want to make one for all my nieces.
This is simple yet beautiful! I love that line of fabrics :)
This lovely thanks for sharing.
This is perfect for me. Thank you. I've been wanting to learn how to quilt, but have been a bit overwhelmed on where to start. I know I can follow this tutorial.
Thank you so much for this tutorial. I was able to spice up the quilt a bit by appliqueing in each block, and it's such an easy pattern to follow and adapt!
Thank you so much for this tutorial, I may actually be able to put together a non-wonky quilt now!
This fabric is wonderful! I am making a quilt with it right now and love it. Your tutorial is great :)