Welcome! I'm Melanie & I sell fabric through my online shop, Modern Organic Fabrics. This journal shares my inspiration and projects, both sewing & non-sewing, as well as shop updates.  

Search
New Fabric!

My Happy Nursery


Herbal-Dyed Fabric


Coming Soon!


Expected: December :: Beach Mod by Monaluna

Expected: October :: Handloom Shirting


Expected: November :: Marine by Dan Stiles

Grab A Button!

Drag & drop the desired button to your desktop, then upload the button to your website and link it to:
http://www.modernorganicfabrics.com


120 X 120


125 X 125


150 X 150


160 X 160


Entries by Melanie O (206)

Tuesday
Oct272009

New Books & Patterns

Waiting for some new fabrics to arrive, in the meantime I'm busily stocking books and patterns!

Three Japanese sewing books translated to English: Carefree Clothes For Girls, Patchwork Style and Linen Cotton Wool. These are beautiful books that are wonderful for inspiration but come with instructions (and patterns in Carefree Clothes For Girls) to make the projects in the books. Baby Love is a book dedicated to baby quilts, written by the talented quilt / fabric designer Alison Jane Smith of Plaids and Prints. Really sweet patterns for boy or girl (or either!) quilts with complete instructions.


New patterns from Farbenmix. There are so many beautiful organic knit fabrics available I thought a few patterns for them would be helpful! I have 3 shirt patterns available (Imke can be used for boys, too!) and a mini-dress / long-cut sweatshirt.


Sunday
Oct182009

Pattern Review: Edward or Eloise Elephant by Audrey and Maude

The Edward or Eloise Elephant softie sewing pattern creates a really cute stuffed animal that is perfect as a baby or Christmas gift (my children take turns sleeping with "Ellie" at night!)

The skill level for this project is an advanced beginner or intermediate. Sewing around the curves might be challenging for beginners. There is also a bit of handsewing (which was a challenge for me, something I need to work on!) This pattern would also be an ideal candidate for an entirely hand sewn project.

Although there aren't a lot of pictures in the pattern, it explains the order to sew things together perfectly, offering tips along the way. I've provided some photos below of some of the potentially confusing construction points. Also, when tracing the pattern pieces you should have the fabric double thickness, or flip the pattern over for one of the pieces.

Sewing first bottom piece to main bodySewing second bottom piece to main bodySewing bottom pieces togetherThe pattern calls for interfacing, which will give the softie a more defined shape. I did not use it, in order to keep mine 100% organic. I think the body looks great, however the ears probably would have looked better with interfacing to help them stand out. If you want to keep your project completely organic, you could use double thickness of fabric on the ears instead of interfacing to add some thickness to help keep the shape.

To get a professional-looking result, be sure to stuff every corner and keep stuffing, stuffing and stuffing! I found a long-handled spoon from the kitchen was a great tool. I used the handle side to push stuffing into the corners and the spoon side to move the stuffing to one side or the other when stuffing the body. I started with the trunk, then did the feet, then the head before working on the body.

If you have any questions about how to put the pattern pieces together, please ask.

I have put some kits in the shop so you can make your own organic, polka-dot softies. Feel free to substitute different fabrics, if you would like.

Thursday
Oct152009

Sneak Preview: Beyond The Sea from Cloud9 Organic Fabrics

Arriving in March, Beyond the Sea is the latest collection from Michelle Engel Bencsko for Cloud9 Organics. I love it sooo much! Can't decide on a favorite, maybe the sandpipers? Or the "pod" diamonds? Or the anemones (that I can now pronounce correctly thanks to Nemo ;) I'm placing my order for the shop today and I'll definitely let you know when it's available for you to order from the shop!

Friday
Oct092009

New In The Shop: Audrey & Maude Patterns

Modern Organic Fabrics Audrey and Maude Softie Patterns

Newly stocked: cute softie patterns and a gorgeous quilt pattern from Australian designers Audrey & Maude. I'm going to try one of these this weekend and I'll post a review and pictures when finished! I've also stocked 100% organic cotton loose fiber for stuffing. I'm thinking of putting together some kits for these patterns. Also, maybe a kit for the 3-2-1 Quilted Throw. Does anyone like kits?

Monday
Oct052009

Tutorial: The 3-2-1 Throw, A Quick & Easy Little Quilt

3-2-1 Quilted Throw My Happy Garden Organic Fabric

It's true! This really is an easy and fast quilted throw! Perfect for beginners who feel a bit intimidated about quilting, or for the more experienced who want to put something together super-quick! This quilt utilizes the "pillow-case" method of binding, so there are no bias strips to make. Please note, however, this method of binding quilts is best only for small quilts like throws and baby blankets.

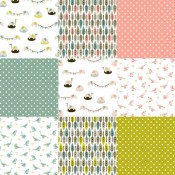
The 3-2-1 Quilted Throw is made with organic fabrics and organic batting. I used fabric from the My Happy Garden collection by Cloud9 Organics. (Found at Modern Organic Fabrics Shop)

Supplies:
~My Happy Garden organic cotton fabric as follows:

  • Speckle Grass - 12 1/2" x 48"
  • Meadow - 12 1/2" x 24 1/4"
  • Speckle Sun - 12 1/2" x 24 1/4"
  • Speckle Sky - 12 1/2" x 16 1/4"
  • Toadstools - 12 1/2" x 16 1/2"
  • Flock - 12 1/2" x 16 1/4" 
  • Lines -  approximately 37" x 49" (this is the backing fabric, it is cut a little large at first and will be cut to size after the front is finished)

~Organic cotton batting: 
  Approximately 40" x 50" (cut a little large, will be cut to size when the front is finished)
~Thread


Tools:
~Rotary cutter & cutting mat (or scissors)
~masking or painter's tape
~pins
~sewing machine (or needle & thread) 

 ***1/4 inch seam allowances are used, unless stated otherwise***

Diagram is not to scale

~Step One~
Cut pieces for quilt front. Do not cut back to exact size yet.

~Step Two~
With right sides together, pin Speckle Sky and Toadstools together on one short side and stitch. Place Flock on Toadstools, right sides together, pin and stitch on short side. 

~Step Three~
With right sides together, pin Meadow and Speckle Sun together and stitch on one short side. 

 
~Step Four~
 Place each column on the batting in it's approximate finished spot. Remove the 3-piece column and the 1-piece column. Pin the 2-piece (middle) column to batting.

~Step Five~
 Stitch the middle row to the batting by stitching around the edge.

~Step Six~
 Place the 1-piece column right side down on the 2-piece column. Pin and stitch long sides together (you are also stitching it to the batting).

~Step Seven~
 Flip the 1-piece column back, pin wrong side to batting. Stitch around edge.

~Step Eight~
 Place the 3-piece column face down on the 2-piece column. Pin and stitch long sides together (you are also stitching it to the batting).

~Step Nine~
 Flip the 3-piece column back, pin wrong side to batting. Stitch around edge.

~Step Ten~
 Trim the batting to the quilt top. Make sure the quilt edges are straight and corners are squared up, trim if necessary.

 
~Step Eleven~
 Tape the backing fabric to a table or the floor right side up. Place the quilt top right side down on the backing and pin. Trim the backing to same size as top, keep quilt pinned together.

~Step Twelve~
Stitch front and back together, leaving a 4-inch opening on one short side.

~Step Thirteen~
Trim the corners. Turn quilt inside-out and use a dull, pointed instrument (such as a chopstick) to turn out corners.

~Step Fourteen~
Press edges. Sew opening closed (the best way is to hand sew it closed).

~Step Fifteen~
Sew around edge of quilt using a 1/2-inch seam allowance.


~Step Sixteen~
You can be finished, if you'd like. This quilt is small enough that you don't have to quilt the back. However, this is a great little quilt to practice some machine quilting. I used a walking foot on my machine and stitched random diagonal lines.  

 ~Step Seventeen~
Wash the quilt in cold water with a mild, eco-friendly detergent. Hang dry, or put in the dryer on low heat.

~Step Eighteen~
Snuggle!